Dirty little secret time: although amateur radio operators talk a good game about relishing the technical challenge of building their own radio equipment, what’s really behind all the DIY gear is the fact that the really good stuff is just too expensive to buy.
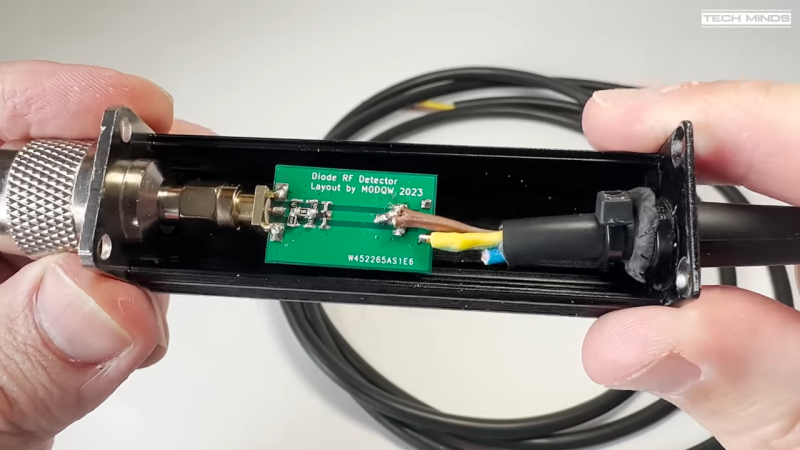
A case in point is this super-low-cost RF power sensor that [Tech Minds (M0DQW)] recently built. It’s based on a design by [DL5NEG] that uses a single Schottky diode and a handful of passive components. The design is simple, but as with all things RF, details count. Chief among these details is the physical layout of the PCB, which features a stripline of precise dimensions to keep the input impedance at the expected 50 ohms. Also important are the number and locations of the vias that stitch the ground planes together on the double-sided PCB.
While [Tech Minds]’ first pass at the sensor hewed closely to the original design and used a homebrew PCB, the sensor seemed like a great candidate for translating to a commercial PCB. This version proved to be just as effective as the original, with the voltage output lining up nicely with the original calibration curves generated by [DL5NEG]. The addition of a nice extruded aluminum case and an N-type RF input made for a very professional-looking tool, not to mention a useful one.
[Tech Minds] is lucky enough to live within view of QO-100, ham radio’s first geosynchronous satellite, so this sensor will be teamed up with an ADC and a Raspberry Pi to create a wattmeter with a graphical display for his 2.4-GHz satellite operations.
Magnetic loop antennas are great if you are limited on space since they are just a potentially small loop of wire. The problem is, they are sharply tuned. You normally have an adjustment capacitor to tune the antenna to different frequencies. [TekMakerUK] built one with a motor and an Arduino that he can tune from an Android phone. You can see more about the project in the video below.
If you want to transmit, the capacitor is often the weak part of the system. Luckily, some old gear yielded a capacitor with multiple sections and enough plate distance to handle the 5W desired. Of course, motor driving a capacitor isn’t a new idea, but this setup is nice since it uses a stepper motor and a rotary encoder.
For now, the control just moves the stepper to a particular position, but long term, there are plans to have presets for each band that the Arduino can set from a single command. You might wonder how the stepper knows where it is since there are no limit switches. It turns out he just stalls the motor and assumes it is at the far limit and then moves it to the other limit (see initMotor) in the GitHub source code.
The Buzzer, also known as UVB-76 or UZB-76, has been a constant companion to anyone with a shortwave radio tuned to 4625 kHz. However, [Ringway Manchester] notes that there is now a second buzzer operating near in frequency to the original. Of course, like all mysterious stations, people try to track their origin. [Ringway] shows some older sites for the Buzzer and the current speculation on the current transmitter locations.
Of course, the real question is why? The buzzing isn’t quite nonstop. There are occasional voice messages. There are also jamming attempts, including one, apparently, by Pac Man.
Some people think the new buzzer is an image, but it doesn’t seem to be the same signal. The theory is that the buzzing is just to keep the frequency clear in case it is needed. However, we wonder if it isn’t something else. Compressed data would sound like noise. Other theories are that the buzzing studies the ionosphere or that it is part of a doomsday system that would launch nuclear missiles. Given that the signal has broken down numerous times, this doesn’t seem likely.
What’s even stranger is that occasional background voices are audible on the signal. That implies that buzzing noise isn’t generated directly into the transmitter but is a device in front of a microphone.
We’ve speculated on the buzzer and the jamming efforts around it before. Not exactly a numbers station, but the same sort of appeal.
If you enjoy old military hardware, you probably know that Harris made quite a few heavy-duty pieces of radio gear. [K6YIC] picked up a nice example: the Harris RF-130 URT-23. These were frequently used in the Navy and some other service branches to communicate in a variety of modes on HF. The entire set included an exciter, an amplifier, an antenna tuner, and a power supply and, in its usual configuration, can output up to a kilowatt. The transmitter needs some work, and he’s done three videos on the transmitter already. He’s planning on several more, but there’s already a lot to see if you enjoy this older gear. You can see the first three below and you’ll probably want to watch them all, but if you want to jump right to the tear down, you can start with the second video.
You can find the Navy manual for the unit online, dated back to 1975. It’s hard to imagine how much things have changed in 50 years. These radios use light bulbs and weigh almost 500 pounds. [Daniel] had to get his shop wired for 220 V just to run the beast.
It is amusing that some of this old tube equipment had a counter to tell you how many hours the tubes inside had been operating so you could replace them before they were expected to fail. To keep things cool, there’s a very noisy 11,000 RPM fan. The two ceramic final amplifier tubes weigh over 1.5 pounds each!
The third video shows the initial power up. Like computers, if you remember when equipment was like this, today’s lightweight machines seem like toys. Of course, everything works better these days, so we won’t complain. But there’s something about having a big substantial piece of gear with all the requisite knobs, switches, meters, and everything else.
We can’t wait to see the rest of the restoration and to hear this noble radio on the air again. You can tell that [Daniel] loves this kind of gear and you can pick up a lot of tips and lingo watching the videos.
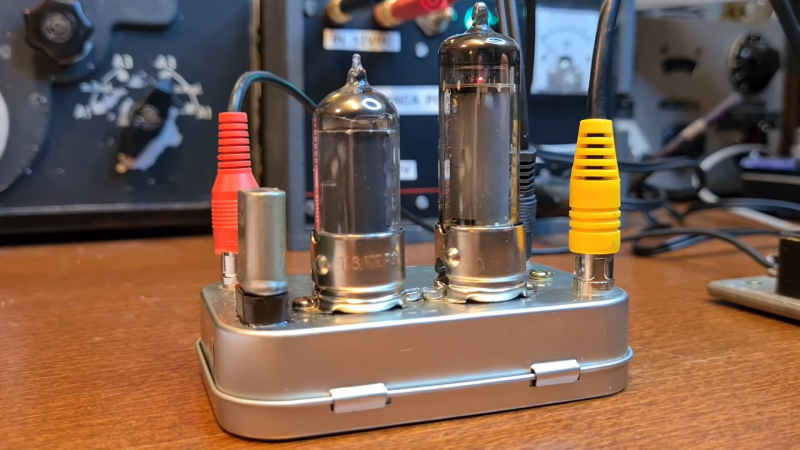
It’s been a long time since vacuum tubes were cutting-edge technology, but that doesn’t mean they don’t show up around here once in a while. And when they do, we like to feature them, because there’s still something charming, nay, romantic about a circuit built around hot glass and metal. To wit, we present this compact two-tube “spy radio” transmitter.
From the look around his shack — which we love, by the way — [Helge Fykse (LA6NCA)] really has a thing for old technology. The typewriter, the rotary phones, the boat-anchor receiver — they all contribute to the retro feel of the space, as well as the circuit he’s working on. The transmitter’s design is about as simple as can be: one tube serves as a crystal-controlled oscillator, while the other tube acts as a power amplifier to boost the output. The tiny transmitter is built into a small metal box, which is stuffed with the resistors, capacitors, and homebrew inductors needed to complete the circuit. Almost every component used has a vintage look; we especially love those color-coded mica caps. Aside from PCB backplane, the only real nod to modernity in the build is the use of 3D printed forms for the coils.
But does it work? Of course it does! The video below shows [Helge] making a contact on the 80-meter band over a distance of 200 or so kilometers with just over a watt of power. The whole project is an excellent demonstration of just how simple radio communications can be, as well as how continuous wave (CW) modulation really optimizes QRP setups like this.
De Kempische Amateur Radiovereniging organiseert dit jaar weer een buitenmarkt op het terrein van de Gilde in Bladel.
Op het terrein verkopen diverse standhouders radio gerelateerde artikelen zoals radio sets, antennes en veel electronica onderdelen. De entree bedraagt €6,-, kinderen t/m 16 jaar hebben gratis toegang en parkeren is gratis. Het adres van de markt is Leemskuilen 16b, 5531 NL Bladel. De toegangsroute wordt bewegwijzerd en er staan verkeersregelaars die je begeleiden naar een parkeerplaats. De markt is geopend tussen 10:00 en 16:00 uur.
Voor elk wat wils, bekend en onbekend met radio.
Hans Peters, voorzitter van de Kempische Amateur Radiovereniging: “ Onze Radiomarkt is in de loop der jaren echt een traditie geworden. We zijn dan ook erg blij dat we de markt weer kunnen houden. Mensen uit het hele land komen er op af. Niet alleen om iets te kopen of ruilen, vooral ook om ervaringen uit te wisselen over de radiohobby en kennis te maken met onze gezellige vereniging en wat we doen en dat ook nog eens in een prachtige omgeving. Iedereen is dus van harte welkom; jong en oud, bekend of nog onbekend met radiotechnieken. We hebben de gezelligste markt van de Benelux!”.
Verkopers:
Geïnteresseerde handelaren of particulieren die een kraam willen huren kunnen een mailtje sturen naar markt@pi4kar.com of het contactformulier op deze website invullen.
The amateur radio community often gets stereotyped as a hobby with a minimum age requirement around 70, gatekeeping airwaves from those with less experience or simply ignoring unfamiliar beginners. While there is a small amount of truth to this on some local repeaters or specific frequencies, the spectrum is big enough to easily ignore those types and explore the hobby without worry (provided you are properly licensed). One of the best examples of this we’ve seen recently of esoteric radio use is this method of using packet radio to play a game of Colossal Cave Adventure.
Packet radio is a method by which digital information can be sent out over the air to nodes, which are programmed to receive these transmissions and act on them. Typically this involves something like email or SMS messaging, so playing a text-based game over the air is not too much different than its intended use. For this build, [GlassTTY] aka [G6AML] is using a Kenwood TH-D72 which receives the packets from a Mac computer. It broadcasts these packets to his node, which receives these packets and sends them to a PDP-11 running the game. Information is then sent back to the Kenwood and attached Mac in much the same way as a standard Internet connection.
The unique features of packet radio make it both an interesting and useful niche within the ham radio community, allowing for all kinds of uses where data transmission might otherwise be infeasible or impossible. A common use case is APRS, which is often used on VHF bands to send weather and position information out, but there are plenty of other uses for it as well.
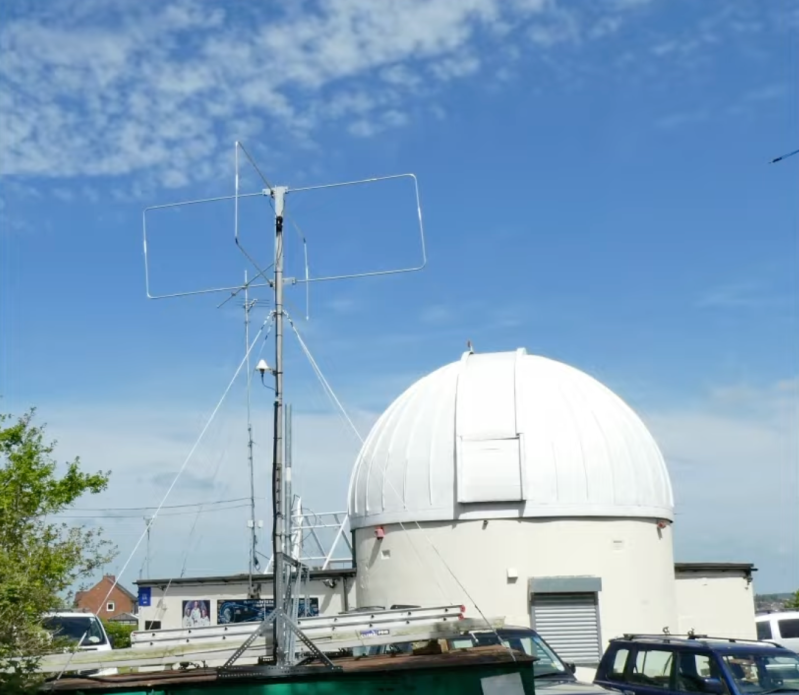
After passing an exam and obtaining a license, an amateur radio operator will typically pick up a VHF ratio and start talking to other hams in their local community. From there a whole array of paths open up, and some will focus on interesting ways of bouncing signals around the atmosphere. There are all kinds of ways of propagating radio waves and bouncing them off of various reflective objects, such as the Moon, various layers of the ionosphere, or even the auroras, but none are quite as fleeting as bouncing a signal off of a meteor that’s just burned up in the atmosphere.
While they aren’t specifically focused on communicating via meteor bounce, The UK Meteor Beacon Project hopes to leverage amateur radio operators and amateur radio astronomers to research more about meteors as they interact with the atmosphere. A large radio beacon, which has already been placed into service, broadcasts a circularly-polarized signal in the six-meter band which is easily reflected back to Earth off of meteors. Specialized receivers can pick up these signals, and are coordinated among a network of other receivers which stream the data they recover over the internet back to a central server.
With this information, the project can determine where the meteor came from, some of the properties of the meteors, and compute their trajectories by listening for the radio echoes the meteors produce. While this is still in the beginning phases and information is relatively scarce, the receivers seem to be able to be built around RTL-SDR modules that we have seen be useful across a wide variety of radio projects for an absolute minimum of cost.
With a UHF antenna, it is easy to rotate a directional antenna to find the bearing to a transmitter. But at HF, it is more common to use an array of antennas that you can electrically switch as well as analyze the phase information between the elements. [Ringway Manchester] has a look at the “elephant cage” antenna used by the US Iron Horse listening network from the 1950s. You can see a video about the giant antenna system, the AN/FLR-9.
Technically, the ring of concentric antenna elements forms a Wullenweber antenna. The whole thing consists of three rings built on a ground screen nearly 1,500 feet across. The outer ring covers from 1.5 to 6 MHz or band A. The band B ring in the center covers 6 to 18 MHz. The inner ring covers band C which was from 18 to 30 MHz. Band A was made up of 48 monopoles while band B used 96 elements. The much smaller band C elements were 48 pairs of horizontally polarized dipoles.
These listening posts could, together, locate an HF signal up to 4,000 nautical miles away. The Wullenweber design, as you may have guessed from the name, originated with the German navy during World War II. It found use in several other systems, although they are relatively rare today, with all of the AN/FLR-9 sites gone.
Cold war hardware is always interesting even if sometimes terrifying. If you think a giant shortwave direction finder is high-tech, you should check out how the Russians bugged IBM Selectric typewriters for a long time undetected.
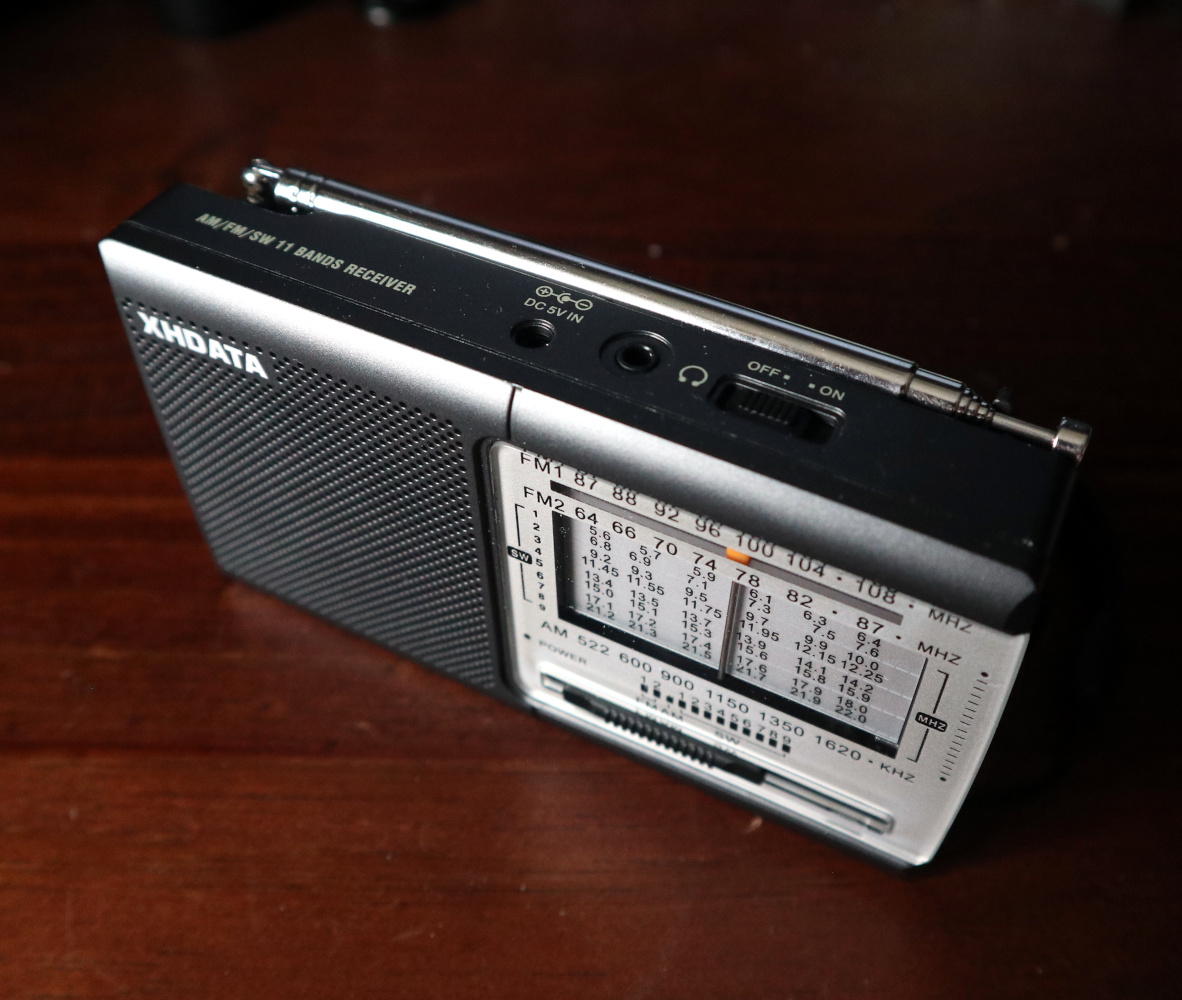
As any radio amateur will tell you, the world of radio abounds with exciting possibilities. Probably the simplest pursuit of them all is that of the SWL, or short wave listener, who scours the airwaves in search of interesting stations. SWLs will often have fully-featured setups with high-end general-coverage communications receivers and tuned antenna arrays, but it can start with the cheapest of radios at its bottom end. Such a radio is the subject of this review, the XHDATA D-219 is a miniature portable receiver that costs under ten dollars, yet is currently the talk of the town in SWL circles. This interest is in no small amount due to its being an especially low-price way to get your hands on a shortwave radio using one of the SIlicon Labs integrated software-defind radio receiver chips. We don’t often review a consumer radio here at Hackaday, but with an avid eye for unexpected gems at the cheaper end of the market this one’s worth a second look.
What Do You Get For Your Tenner?
This form factor is very typical for cheap “world band” radios.
I ordered my D-219 from the XHDATA website, spending about £10 including the postage from China. The usual wait ensued before the package landed on my doormat, and inside was the radio in its box with an instruction leaflet. It’s a small unit about 135 mm x 75 mm x 30 mm, and it follows closely the form factor of other similar radios.
On the top is the extensible antenna with an on-off switch and sockets for headphone and 5 V power, on the side are side-on knobs for tuning and volume, while on the front is the speaker and old-style multi-band tuning display.
On the back is a flip-up stand and a hatch for a pair of AA cells. There’s a band switch covering AM, nine different shortwave bands from 4.75 MHz to 22 MHz, the east Asian FM band from 64 MHz to 87 MHz, and the international FM band from 87 MHz to 108 MHz. The tuning indicator is very old-school, a vertical bar that moves across a frequency scale with the tuning knob.
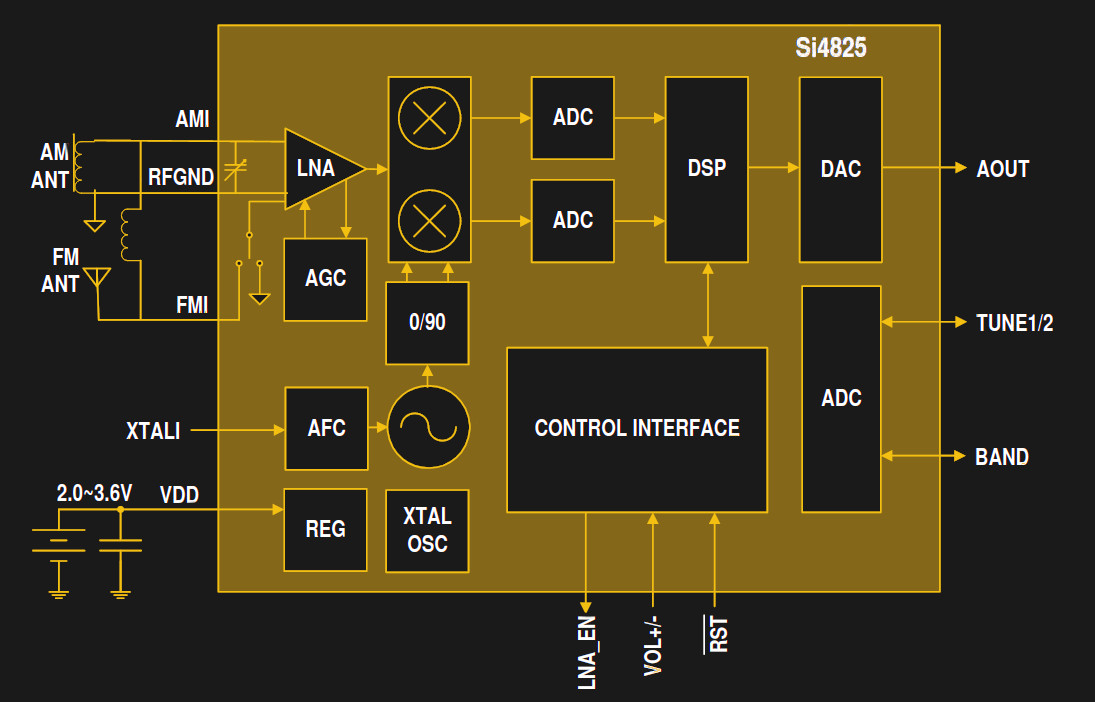
There’s not much to a radio using one of these chips.
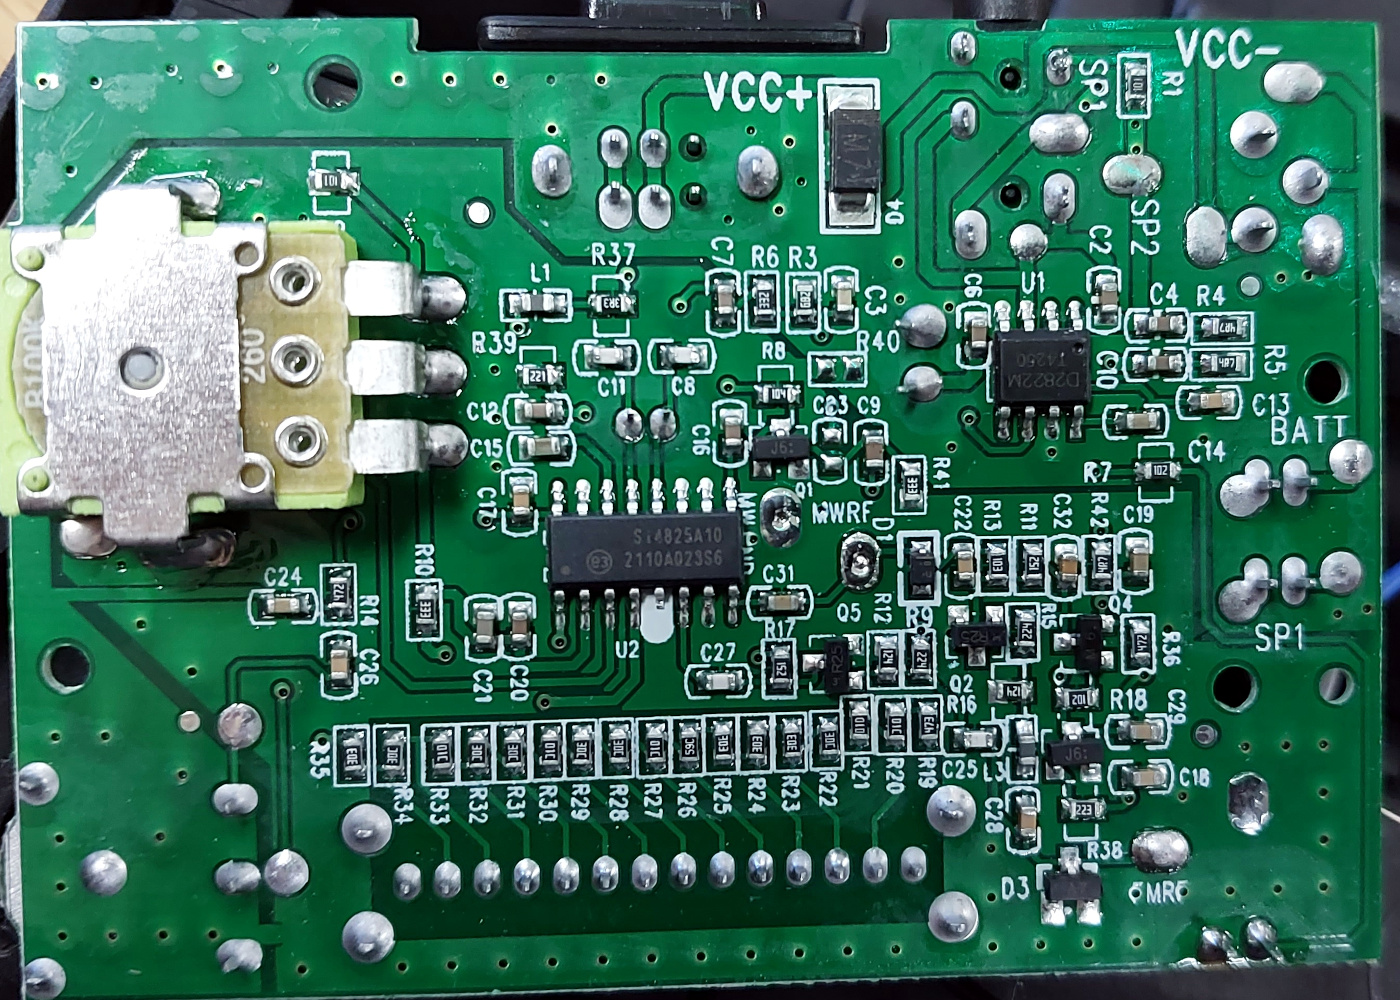
Opening it up, and it’s immediately obvious how simple the DSP chip makes a radio like this. Where once you’d have seen a board covered in analogue circuitry taking up most of the space, now aside from the AM ferrite rod antenna there’s a board about a third the size of the case, behind the tuning display. Carefully lifting this up reveals the circuitry, all surface-mount, with a Silicon Labs Si4825 single-chip DSP radio, and a Shaoxing Silicore D2882 audio amplifier being the only integrated circuits.
How Does It Compare To Older Cheap Radios?
It seems crazy to give an SDR an analogue interface using an ADC, but you can’t deny it works.
The Silicon Labs single-chip radios are nothing new, having been on the market for over a decade. They come in a wide variety of versions for different applications and control methods, with the Si4825 being one of the lower-end versions. In keeping with its traditional analogue interface it doesn’t have any digital controls, instead it achieves both tuning and band switching by means of voltage. A switched voltage divider selects the band, while a variable resistor serves as the tuning control. Some of the higher-spec chips in the series allow the insertion of DSP code to demodulate for example SSB signals, but this one remains firmly stuck with AM, and FM on the two VHF bands. Inserting some batteries and turning it on, and there were the usual dial-full of FM stations. The real action though lies in the shortwave bands, so that was where I headed next. And immediately I had in my headphones a world of stations, and while the shortwave bands have seen a decline since I first listened to them back in the 1980s, there were still enough for me to quickly identify stations from the far east, north America, the Arabic-speaking world, and from eastern Europe.
Compare this traditional receiver with the SDR block diagram above. Chetvorno, CC0.
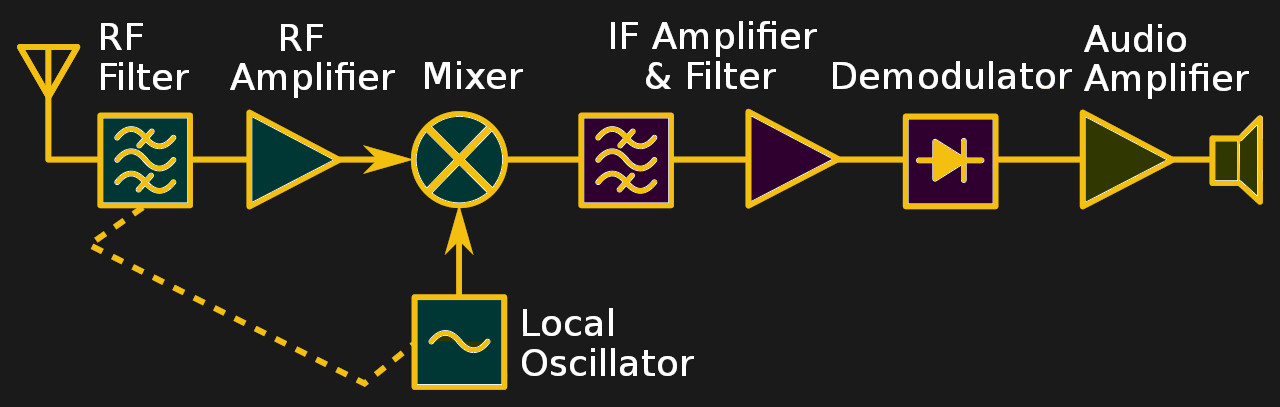
When evaluating a small portable shortwave radio like this one it’s important to understand a little about how such radios have traditionally worked. My other older cheap radio with a few shortwave bands is a more conventional model, it has a tuning capacitor that controls both an input tuned circuit and an oscillator. The oscillator is set 455 kHz away from the desired station, and the signal from the antenna is mixed with it to create a so-called intermediate frequency, the difference between the two at 455 kHz. This is then fed into an IF amplifier tuned to 455 kHz from which the audio can be demodulated.
It has two major shortcomings, first that 455 kHz isn’t enough distance from the receive frequency in a cheap shortwave radio, and second that the bandwidth of that 455 kHz amplifier is quite wide. The first leaves the possibility of receiving whatever is on the sum of the oscillator and 455 kHz alongside its difference, while the second sets the slice of spectrum that you are listening wide enough that more than one station can be heard at once. More expensive traditional receivers like my workhorse 1980s Lowe solve this by using a much larger frequency difference than 455 kHz and some expensive filter components to reduce that bandwidth, but you would certainly find neither in a ten dollar radio. The experience of short wave listening on a very cheap radio has thus always been rather dismal. Tuning is difficult, and there is lots of interference and breakthrough from other stations.
How Good is It And Should You Buy It?
A radio based on one of these Silicon Labs chips immediately solves both of the problems from the previous paragraph due to its software-defined architecture: it has no IF offset to worry about, and it replaces the need for those expensive filters by means of signal processing in its software. Thus the effect is much more similar to that of a receiver with one of those expensive IF filters: there’s little or no breakthrough from all those adjacent stations, and tuning becomes much easier. It also seems as though the demodulator is better than its analogue equivalent, returning even weak signals in a much clearer form. How much of this is my imagination and how much DSP tricks I can’t tell you, but the radio certainly delivers.
To sum up the D-219 then, it’s a good little radio that gives good results for a pocket-money price, and I can see why the SWL community are rather excited about it. It will never equal a high-end general coverage receiver with a well-implemented antenna array and even the Silicon Labs SDR chip is not new, but for the price of a couple of pints of beer it’s a no-brainer and a diamond in the rough.