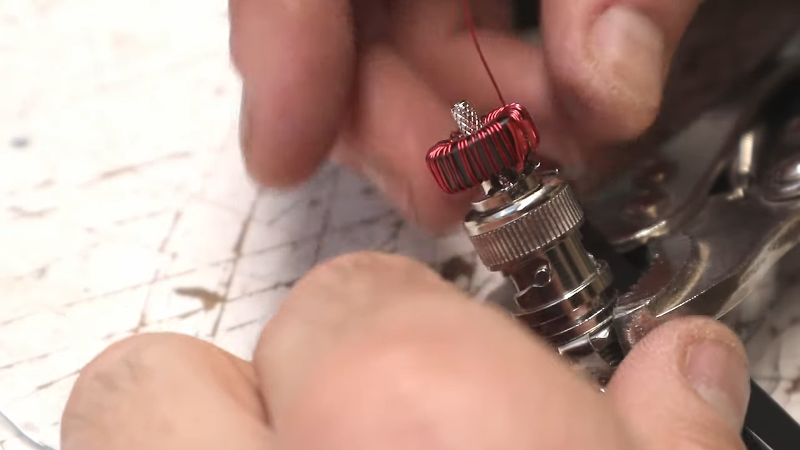
[K6ARK] likes to operate portable, so he puts together very lightweight antennas. One of his latest uses tiny toroids and SMD capacitors to form trap elements. You can see the construction of it in the video below.
You usually think of toroid winding as something you do when building transmitters or receivers, especially small ones like these. We presume the antenna is best for QRP (low power) operation since the tiny core would saturate pretty quickly at higher power. Exactly how much power you should pass through an FT50-43 core depends on the exact application, but we’ve seen numbers around 5 watts.
The SMD capacitors mount right inside a hacked up BNC connector. That makes for a very compact construction at the expense of a little fine work with a soldering iron while building. There is more construction detail on similar traps in a second video that you can see below.
The availability of antenna analyzer equipment makes projects like this easier. The concept of end-fed halfwave has its detractors and proponents. [AA5TB] has a page that explains a bit about the theories surrounding the antenna. Regardless, [K6ARK] says he’s worked the world on this type of antenna and many people swear by them.
Not a ham yet? [Dan Malone] wants you to invest $50 and change that. We suspect, though, you’ll be happier with more wire in the air.
Hiermee nodigen we je uit voor de gezamenlijke lezing van VERON en VRZA Zuid Limburg. De omstandigheden lenen zich nog niet voor een fysieke bijeenkomst, daarom starten we op woensdag 18 november 2020 met een lezing via internet m.b.v. Jitsi.
Deze avond zullen Jan PA0SIM en Loek PE0MJX ons alles gaan vertellen over de door hun gerealiseerde Web-SDR in Maasbree. Waarom een WebSDR ? Hoe zoek je een geschikte locatie en hoe installeer je een WebSDR ? Welke antenne en ontvangers worden gebruikt ? Wat betekent het om een WebSDR te configureren? Waarom is het technisch interessant en uitdagend ?
Ten opzichte van een eerder gehouden landelijk RF-Webinar is het verhaal aangepast en geactualiseerd.
– òf ga in de JITSI app op je mobiel: pi3zlb – sluit deze wel aan op de lader i.v.m.het energieverbruik van je mobiel!
Als alles goed gaat kom je dan in het virtueel/digitaal vergaderzaaltje waar we elkaar kunnen treffen. De meeting start om 20 uur, maar het ‘zaaltje’ zal rond 19.45 al open zijn voor mensen die nog wat hulp nodig hebben met de bedieningsinstructies. Het audio van de zondagochtendronde wordt ook gestreamd via https://meet.jit.si/pi3zlb dan is het oom mogelijk om Jitsi te testen.
Graag tijdens de lezing de camera uit laten, en microfoon alleen inschakelen indien je wat wil zeggen.
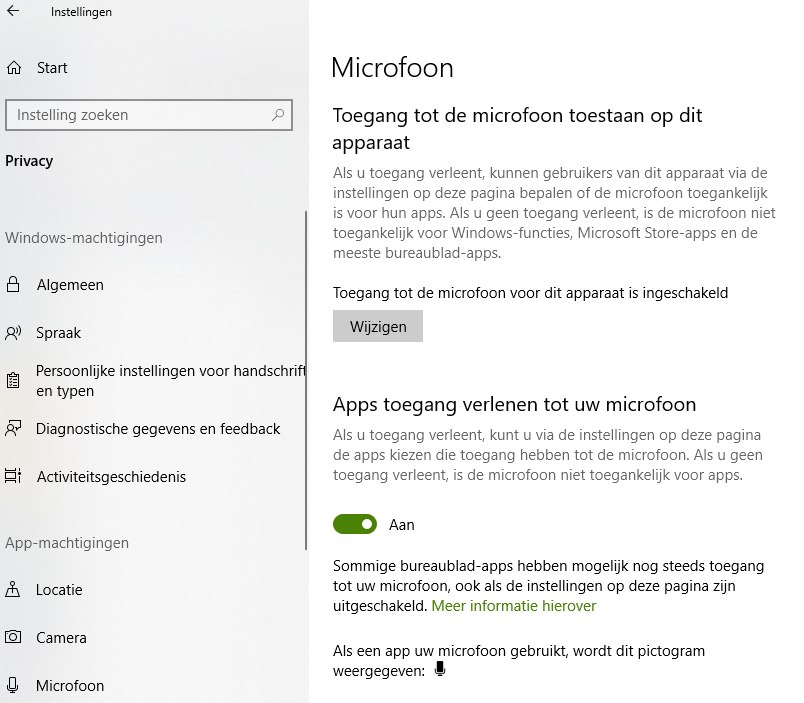
** Wie voor het eerst met jitsi aan de slag gaat, kan mogelijk tegen privacy instellingen op de PC aanlopen. Check bij Instellingen / Privacy dat programma’s de microfoon / camera mogen gebruiken.
We denken hiermee weer een interessant onderwerp te bieden, graag tot ziens dus op woensdag 18 nov om 20.00u
Belangstellenden van buiten de verenigingen zijn welkom.
I suppose most of us have had the experience of going to the mailbox and seeing that telltale package in the white plastic bag, the sign that something has just arrived from China. This happened to me the other day, and like many of you it was one of those times when I puzzled to myself: “I wonder what I bought this time?”
With so many weeks or months between the time of your impulsive click on the “Buy Now” button on AliExpress or eBay and the slow boat from China actually getting the package to your door, it’s easy enough to forget what exactly each package contains. And with the price of goods so low, the tendency to click and forget is all the easier. That’s not necessarily a good thing, but I like surprises as much as the next person, so I was happy to learn that I was now the owner of a tinySA spectrum analyzer. Time for a look at what this little thing can do.
First Impressions
A caveat: I’m by no means an expert on spectrum analyzers. In fact, this is the first time I’ve ever handled one, unless you count using the FFT functions in my digital oscilloscope, which you probably shouldn’t. So there’s probably plenty of room for operator error and misconceptions about what a spectrum analyzer can do in the tests that I ran, but I still think this is valuable as an example of what a tool like this can do in the hands of an enthusiastic newbie.
Anyone familiar with the NanoVNA, a small but full-featured vector network analyzer that we’ve featured a few times on these pages, will see a strong family resemblance between it and the tinySA, both in the hardware and the software. That’s for good reason — the code behind tinySA is a fork off the NanoVNA codebase, and the main developer of NanoVNA, edy555, is a contributor to the tinySA project, which is owned by Erik Kaashoek.
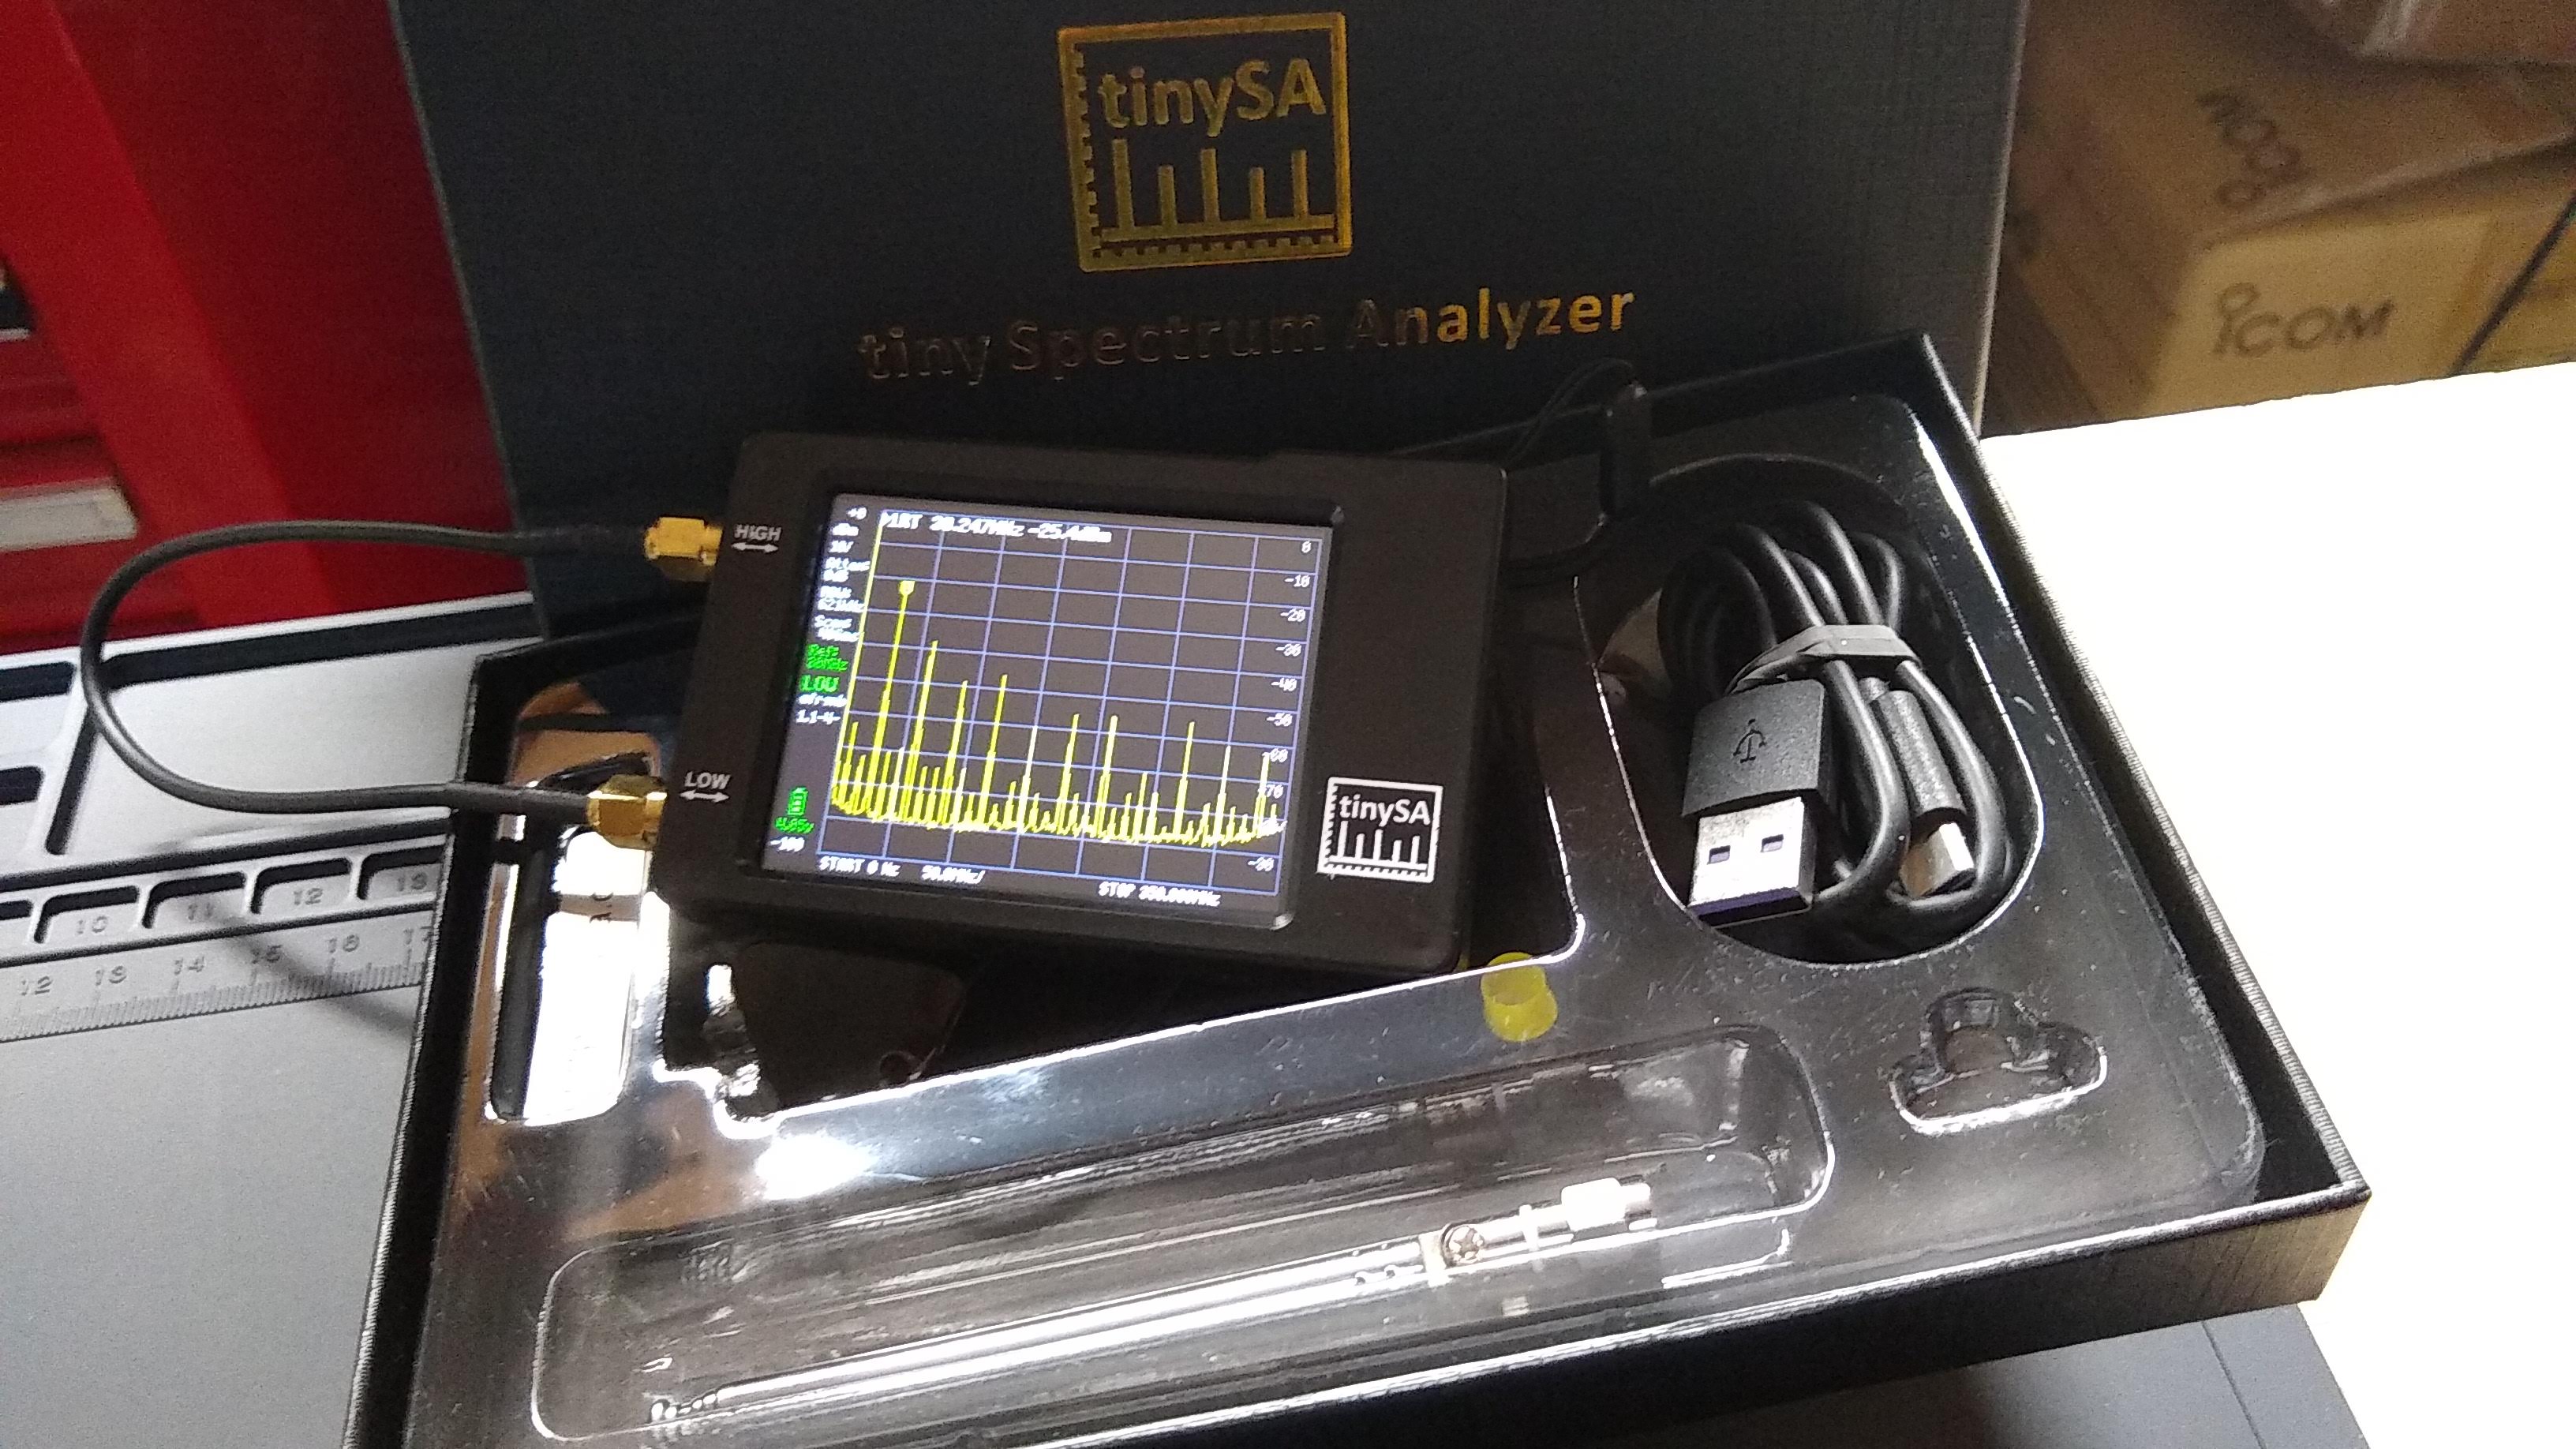
The tinySA arrived in a surprisingly nice “presentation quality” box with a gold-stamped logo on the top. Erik takes pains to note that this is one way to tell you’re getting an original tinySA as opposed to one of the inevitable knock-offs that’ll flood the market soon enough. I’m not sure that alone would keep the pirates at bay, but it’s at least an attempt and it’s a nice touch to boot.
Along with the tinySA, which is about the size of a deck of playing cards, the box contains a pair of SMA jumper cables, a small telescoping whip antenna, a female-to-female SMA adapter, a wrist strap, and a USB-C cable. The case of the tinySA is injection molded ABS, and a nice upgrade in look and feel from the open board design of the NanoVNA. The front of the tinySA has no controls, just the 2.8″ 320×240 resistive touch-screen display. The top has a power switch and a jog control. The left side has two SMA jacks, labeled HIGH and LOW. It’s very lightweight but feels solid in the hand.
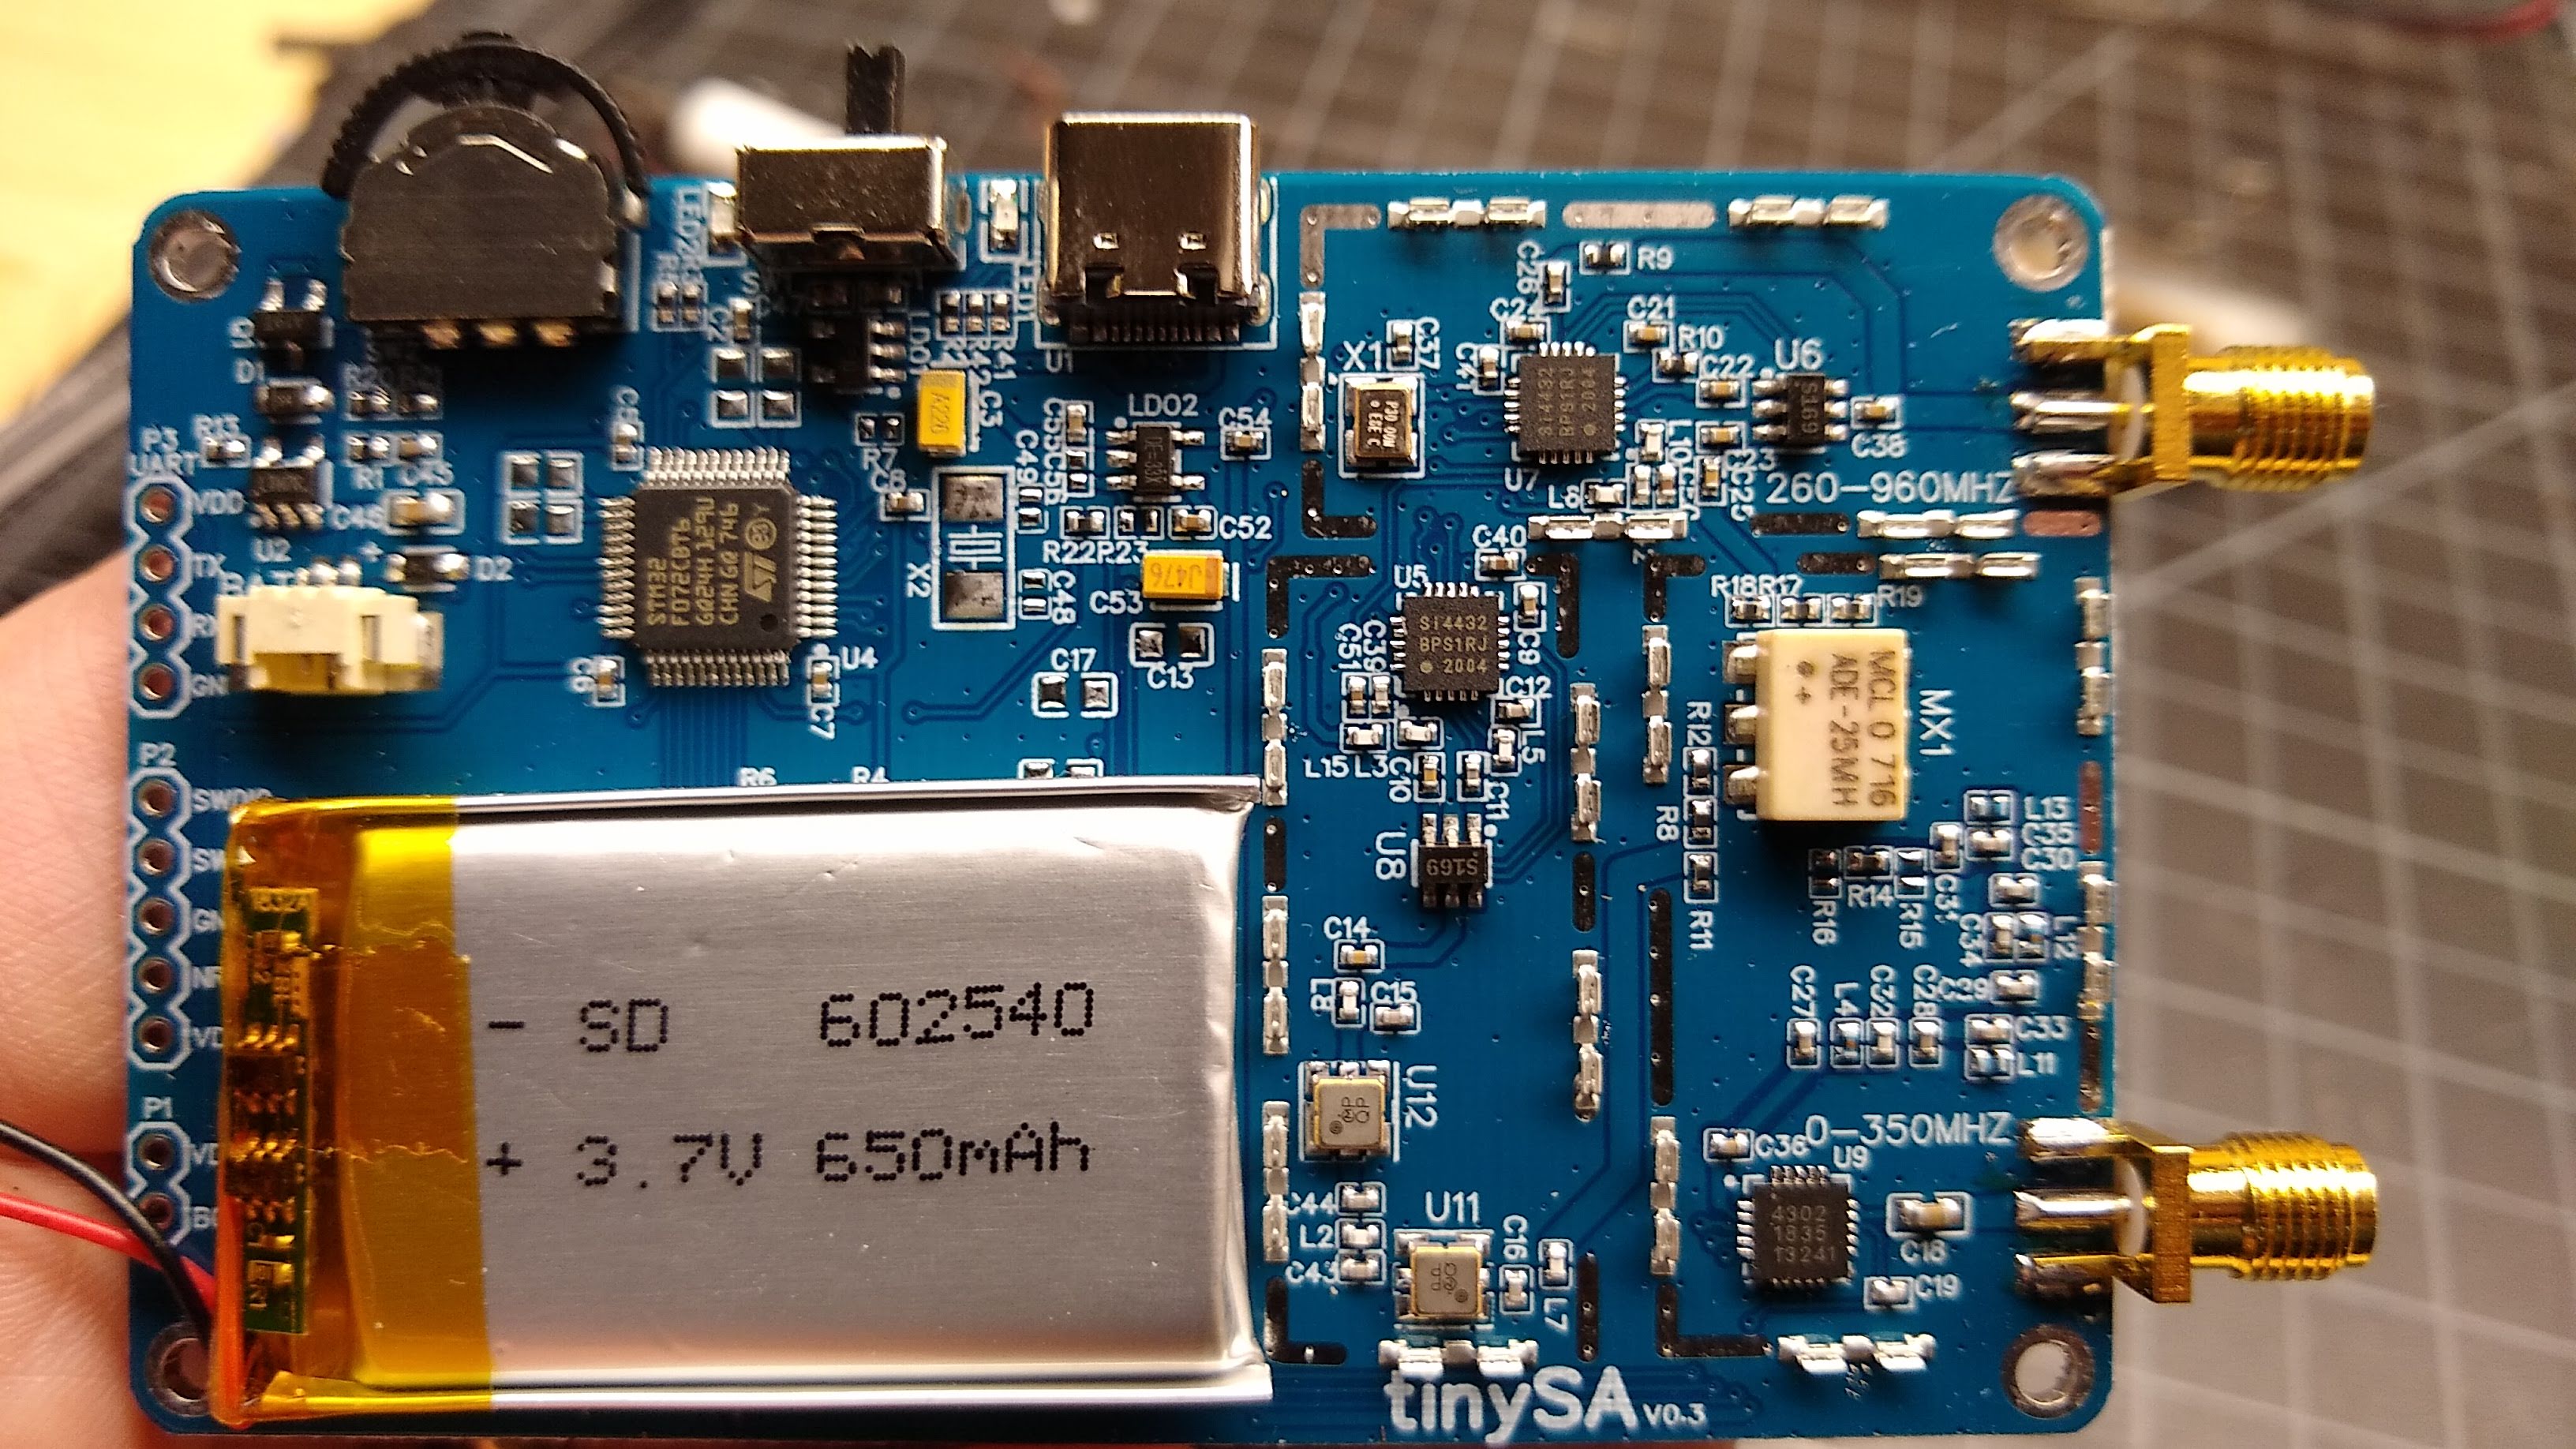
A look inside the tinySA, with the RF shields removed.
Of course the first thing I did was pop the case open and take a look inside. There’s not a lot to see at first — most of the interesting RF stuff is safely tucked under shielding. I figured I’d have to bust out the Hakko to take the tins off, but luckily they’re all spring-clipped to the ground plane, so removing them just took a small screwdriver. Underneath lay the expected RF wizardry, including the expected Silicon Labs chips. I found two Si4432 ISM transceiver chips, presumably one each for the high and low range of the tinySA. There’s also what appears to be a Peregrine Semiconductor PE4302 RF digital attenuator, and a bunch of other goodies. The layout is nice with plenty of via stitching, and the assembly quality is really good.
Satisfied with the insides, I moved on to the “First Steps” as listed in the video below, to get acquainted with the device. Erik has chosen to rely on the tinySA wiki and some how-to videos for most of the documentation, and while that’s understandable it also leaves a few holes that are up to the user to fill in. For those of us who prefer a real manual, Kurt Poulsen, a ham from Denmark, has written up a comprehensive how-to document that might be of help.
Anyone who has used a NanoVNA will feel at home in the tinySA interface. Calibration of the tinySA is done via the built-in signal generator, more on that below. Calibration itself is simple: hook the jumper coax between the two SMA jacks and select LEVEL CAL from the configuration menu. The calibration then proceeds automatically. The same menu offers a self-test function too, which cycles through a series of ten tests that take about 15 seconds to complete.
The Good Stuff
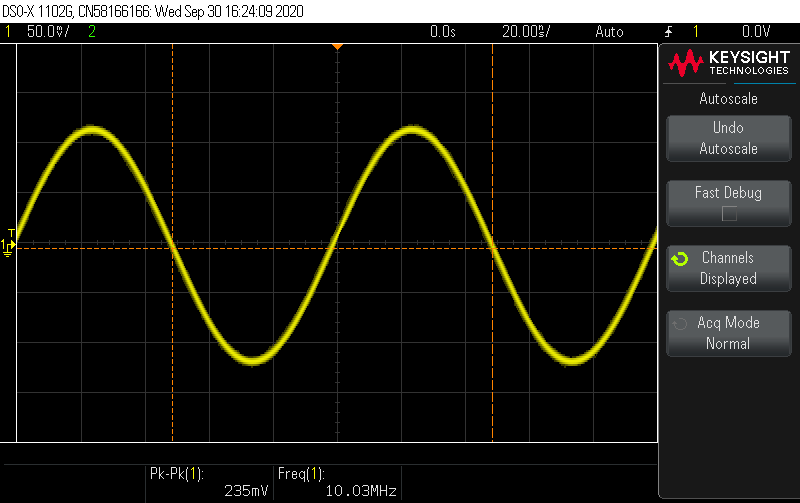
As for its primary purpose, the tinySA performed admirably in my limited tests. I took a look at the spectrum of signals generated by my scope’s built-in waveform generator and everything looked good — a 10-MHz sine wave appears as a single strong fundamental spike and one harmonic about 50 dBm lower. Switching the waveform to a square wave at the same frequency did what I thought it would — a big peak at the fundamental and a bunch of spurs at the odd fundamentals.
Output from the tinySA on my scope – solid, clean 10-MHz sine signal.
With the basics out of the way, I took a look at the tinySA’s built-in signal generator. As mentioned above, the signal generator is used for calibration, but it’s a pretty capable tool all on its own. It’s actually more of a function generator, since it can not only output a nice clean sine wave on the low output between 100 kHz and 350 MHz, but it can also modulate the signal (AM, narrow FM, and wide FM) and do sweeps both across a frequency range and over amplitude. On the high output, the signal generator does a square wave output from 240 MHz to 960 MHz with a configurable, non-sweepable amplitude, narrow FM or wide FM modulation, and a frequency sweep.
I gave the signal generator a go and took a look at its output with my Keysight DSOX1102G. The sine wave generated on the low output looked clean across the specified bandwidth, and the frequency was spot on. I tried playing with the modulation function, and it worked pretty much as I expected. It’ll be nice to have another signal generator around the shop.
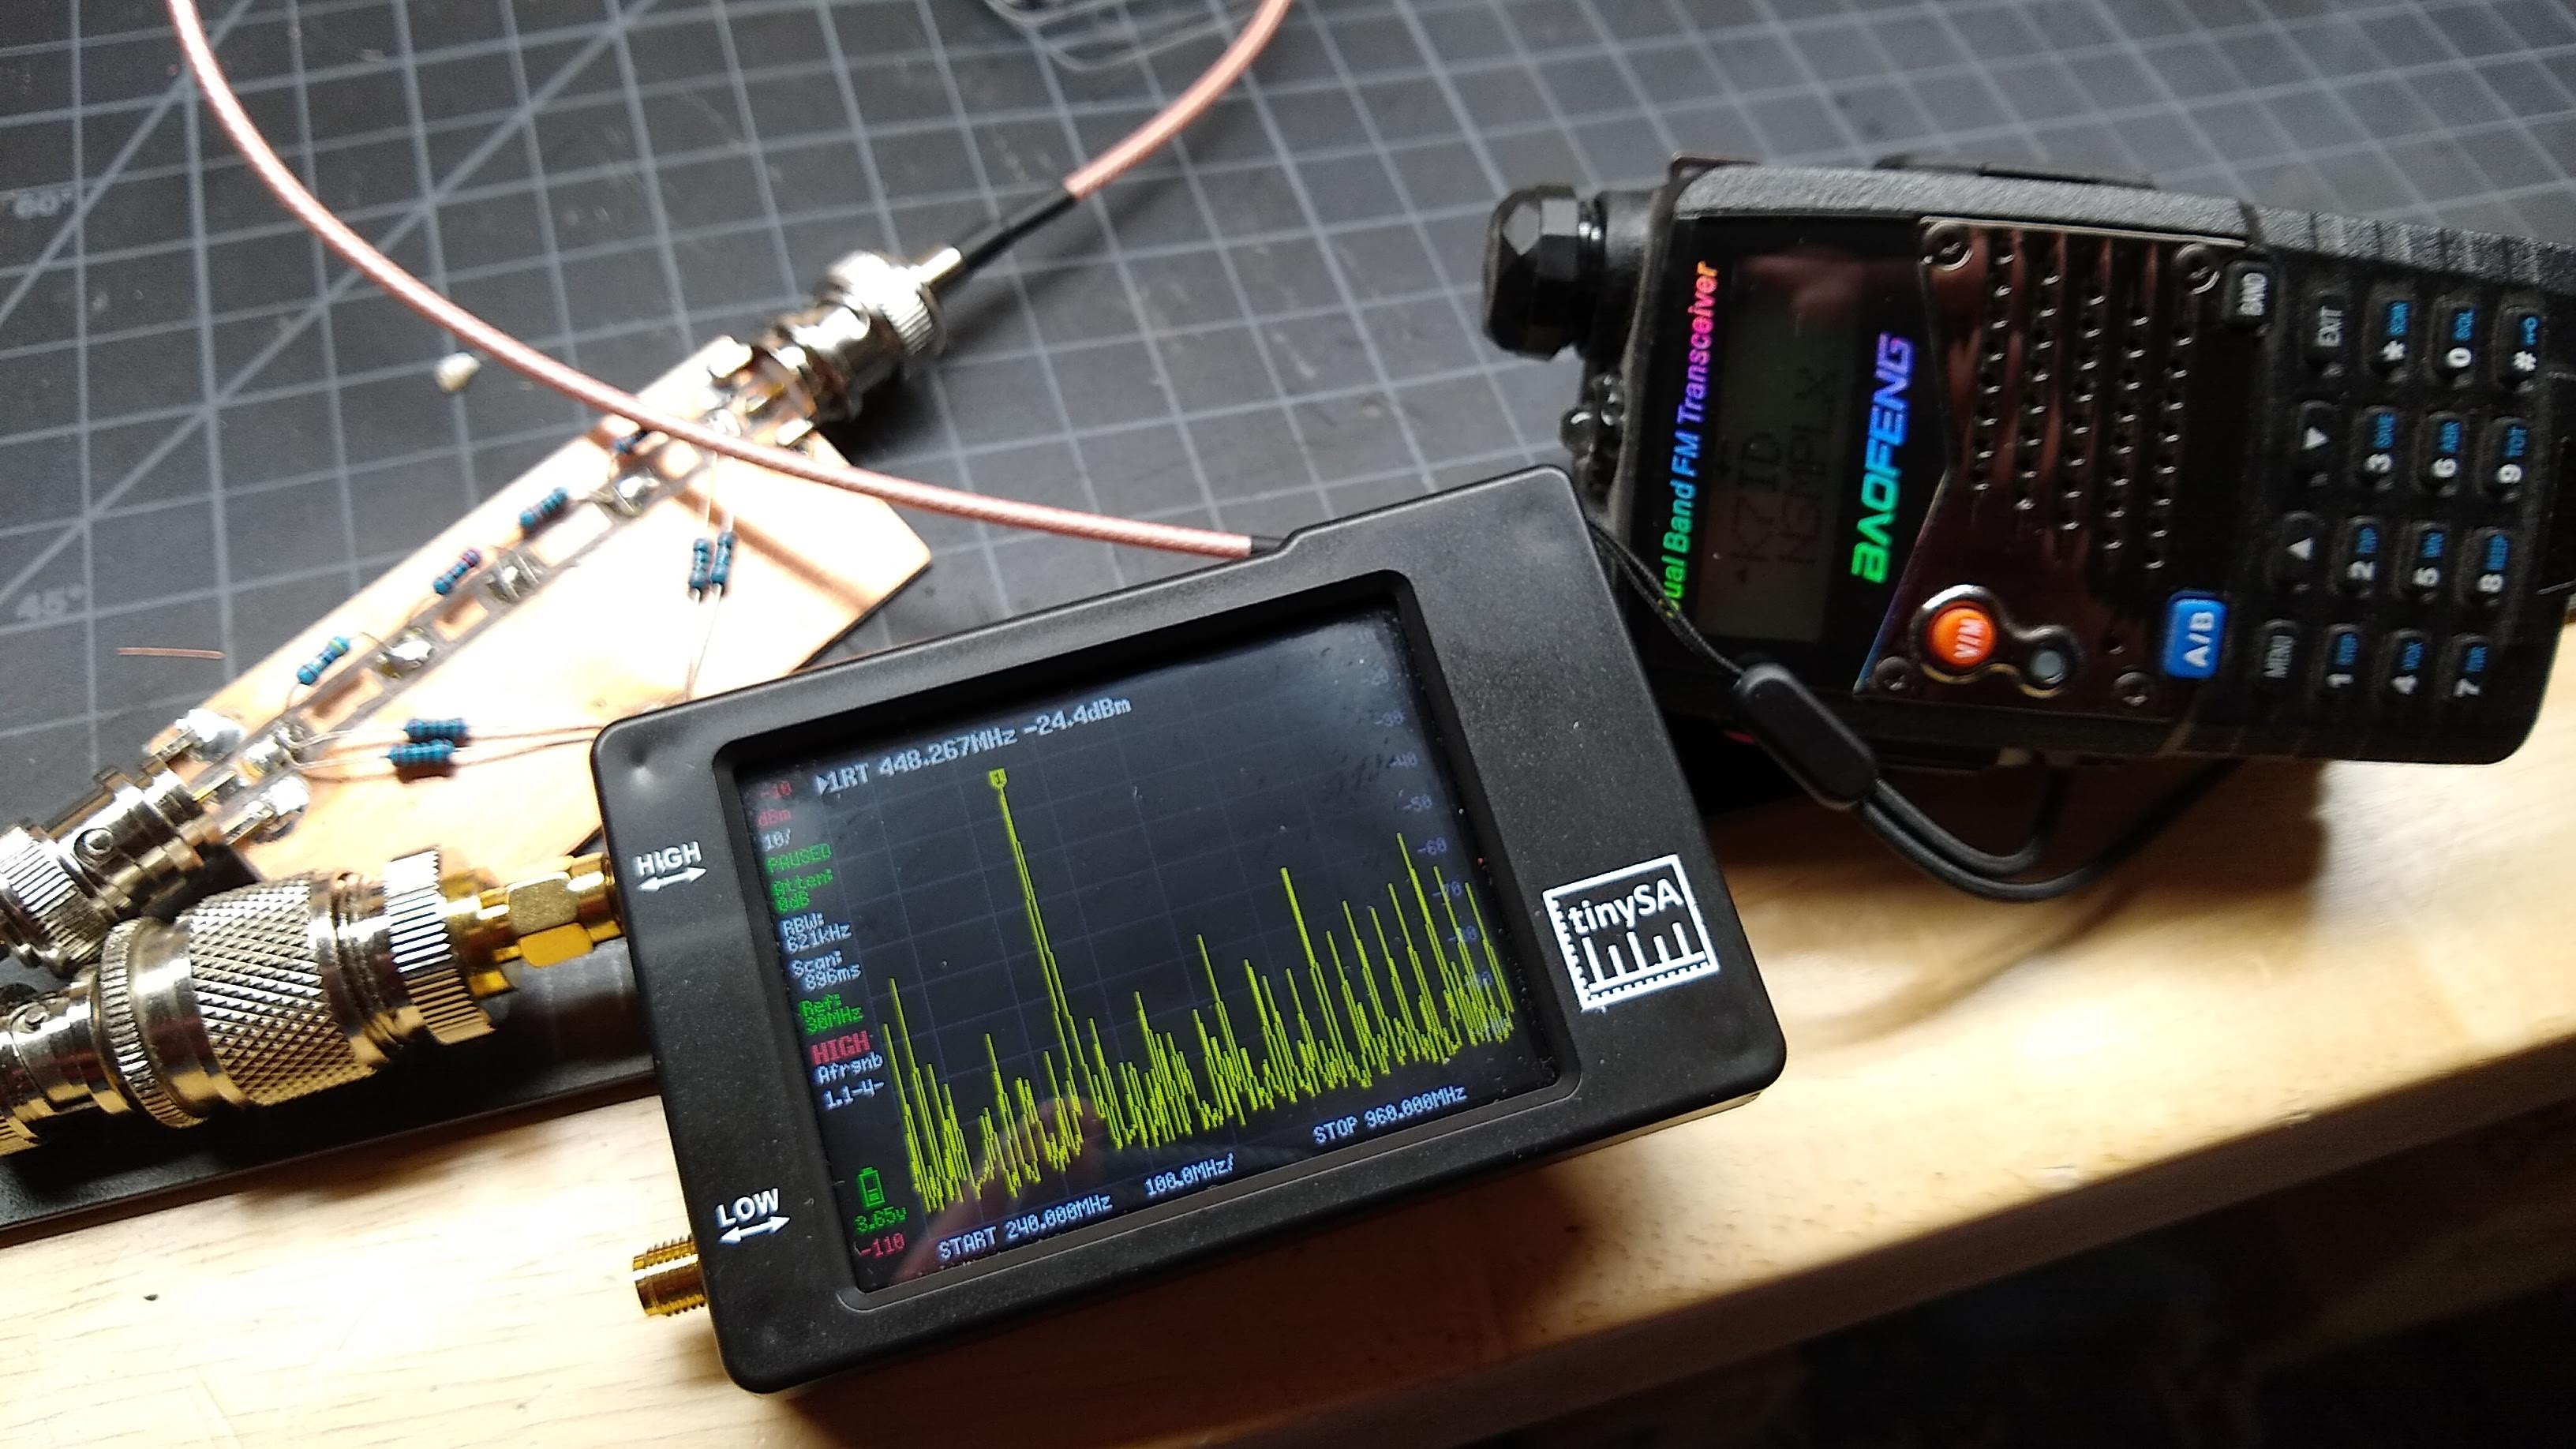
My janky test setup: UV-5RA, homebrew 40 dB attenuator, and the tinySA.
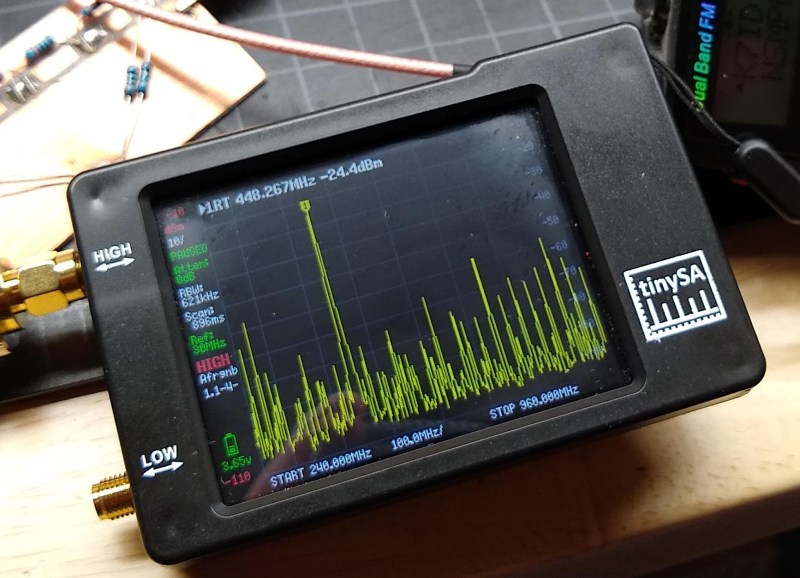
With all the pleasantries dispensed, I turned to the one task pretty much every ham will want to turn a spectrum analyzer on: finding out just how bad the signal from a cheap handy talkie is. I talked about this a bit in one of my $50 Ham articles, and we’ve seen comprehensive analyses of spurious emissions from these radios that are far more in-depth than anything I could come up with using the tinySA. But still, I thought I’d give it a whirl. I grabbed my Baofeng UV-5RA, a homebrew 40 dB attenuator I built a while back, and an unwieldy collection of adapters to connect everything together.
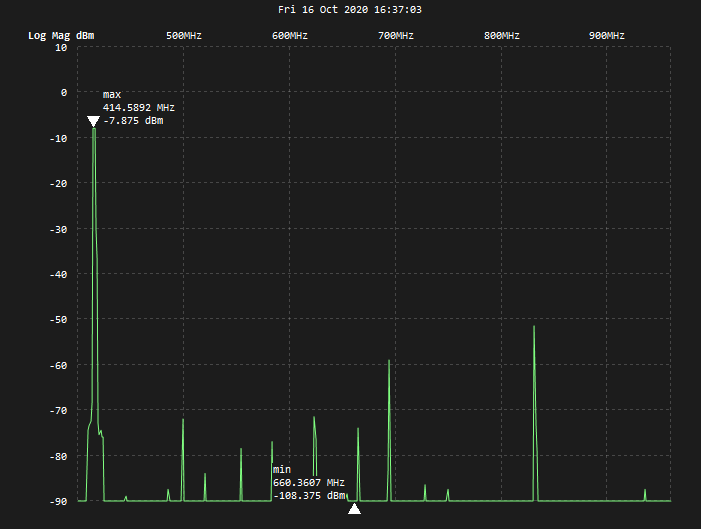
Being under the impression that the spurious emissions on Baofeng tend to be worse on the UHF band, I tried 420 MHz first. The first thing I noticed was that the fundamenal was off a bit from the where it should be. I also noticed a small forest of spurs starting at 500 MHz and extending all the way up past 800 MHz. The strongest spur was about 43 dBm down from the fundamental. The FCC rules on spurious emissions don’t seem to cover this band, but they do say that between 30 and 225 MHz, spurs need to be at least 40 dBm below the fundamental. So within the limits of my test setup, the Baofeng seems to just barely comply.
Spurious emissions from a Baofeng UV-5RA at 420 MHz. The big spur at about 825 MHz is the only one that comes close to exceeding the limits.
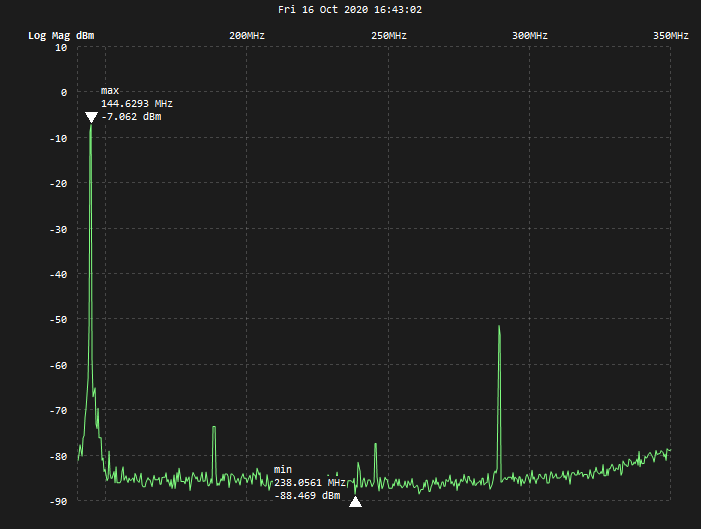
Just for completeness, I repeated the same test on the 2-m band. The signal was much cleaner here, with only a few spurs, the big one being at around 270 MHz. Again, this was about 43 dBm down from the fundamental, meaning it was probably in compliance. Again, this was only a rough test, with a test setup leaving much to be desired. But still, the tinySA is a nice way to take a look at what you’re actually putting out into the ether, and to at least get a rough idea how clean you’re operating.
A much cleaner signal from the same radio on the 2-m band.
The Not-So-Good Stuff
Like the NanoVNA before it, the tinySA has the capability of PC control. The Python program, TinySASaver, is geared mostly toward saving scans from the tinySA, but also provides additional capability, like doing frequency sweeps in segments and exporting data for further analysis. It also implements time-domain reflectometry (TDR) to measure cable lengths and find faults. Sadly, try as I might I was unable to get TinySASaver running on my Ubuntu machine. Erik is pretty clear that the code is still rough, and I’m far from a Python guru so I might be having library problems that would be easy to fix for someone with more experience. Luckily, I was able to scrounge up a decrepit Windows laptop and get a compiled version of another program running, so I didn’t have to resort to cell phone pictures for my screenshots.
I have noticed a couple of other annoying issues. The biggest is that the tinySA appears to crash when you click the screen off of one of the menus. This is annoying, as I often found myself stuck in a menu with no obvious “Back” button, and clicking on the background seemed like an intuitive way to work back to another menu. But this just throws a dump of all the registers up on the screen and locks the thing up. It’s not a huge deal to recover — toggle the power and it’ll boot right back up — but it can be annoying.This bug has been removed recently so this is working as it should by now.
I also found the touchscreen a bit finicky, which was a common complaint with the NanoVNA. The screen is far too small for my meathooks, but without a proper stylus, I resorted to a plastic spudger that worked only most of the time. Of course it was only then that I looked in the box and noticed the wrist strap with the attached guitar pick-like stylus — a thoughtful accessory indeed.
Verdict
I’m not entirely sure what I paid for the tinySA — like I said, I tend to order these things and then just forget about them. But I think it was around $60, and at that price I’d say adding a tinySA to your toolkit is a no-brainer. It’ll never substitute for a larger, full-featured instrument, but if your only need for a spectrum analyzer is to design the occasional filter or check signal quality, the tinySA is a pretty good deal.